


Dandelion Pouch (Free pattern)
😀 Support me by buying a PDF version of this pattern! The PDF is a printable version of this pattern with crochet charts and additional photos
DESCRIPTION
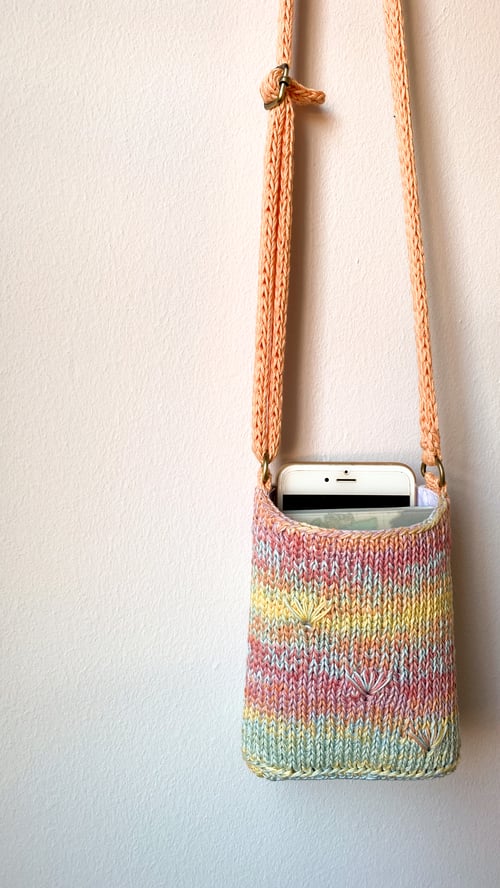
A simple travel pouch with a crochet base, knitted body and straps. Short rows raise the back of the pouch so you have a curved opening that makes it easier to reach for things in your pouch.
SIZING
This pattern comes in 1 size (width x height x depth: 11cm x 12-14cm x 3.5cm) but you can adjust the height to be slightly taller or shorter.
CONSTRUCTION
The pouch body is knit bottom up with crochet thread size #3 held double (you can also use DK weight yarn). The base is made up of 2 layers, each crocheted with one strand of crochet thread size #3. The body and base are seamed together. Fabric and/or interfacing is used to line your pouch before the strap is added.
YARN
Knitted body: 30g of crochet thread size #3 held double (or 30g DK weight yarn)
Base: 12g of crochet thread size #3
Strap: 8g of crochet thread size #3 held double (or 8g DK weight yarn)
*yarn amounts are estimated
NEEDLES & NOTIONS
4mm circular needles, or dpns
3.5mm crochet hook
Tapestry needle, waste yarn or stitch holders
Stitch markers (1 distinct marker for beginning of round, plus additional markers)
Optional
Fabric for lining (25cm x 20cm)
Stiff interfacing (30 cm x 30cm)
Sewing thread and scissors
2 D-rings (15mm inner width)
1 Adjustable/sliding buckle (15mm inner width)
GAUGE
KNIT: 20 sts and 28 rounds = 4” (10cm) in stockinette with 4mm needles, washed and blocked
CROCHET: 15 sc sts x 15 rows = 2” (5cm) with 3.5mm hook
ABBREVIATIONS
| BO: bind off BOR: beginning of the round ch: chain CO: cast on dandelion: dandelion stitch dc: double crochet flo: front loop only inc: increase / increased k: knit k2tog: knit 2 together p: purl pm: place marker rep: repeat Rnd: round RS: right side of the work |
sc: single crochet |
TECHNIQUES
Long-tail Cast-on: purlsoho.com/create/long-tail-cast-on/
Dandelion stitch: Insert right-hand needle into the third stitch down from the second stitch on left needle (this space forms the centre of the flower) and draw through a loop, leave loop on right-hand needle and knit 2, make second loop into same stitch, knit 2, make third loop into same stitch.
Video tutorial: https://www.knittingstitchpatterns.com/2014/11/dandelion-flowers.html
Knit Body
Longtail cast on 55 sts and join in the round without twisting your sts. Add a BOR stitch marker. The BOR marker is positioned at the back of the pouch
Rnd 1: k14, pm, k26, pm, k14
Use 2 additional locking st markers to mark out the side stitches on the 1st round of your body. These markers will stay on Rnd 1
Rnds 2-7: k all sts
Rnd 8: k to m, sm, k5, dandelion, k to m, sm, k to BOR
Rnd 9: k to m, sm, k4, (k2tog, k1) x 2, k2tog, k to m, sm, k to BOR
Rnds 10-16: k all sts
Rnd 17: k to m, sm, k12, dandelion, k to m, sm, k to BOR
Rnd 18: k to m, sm, k11, (k2tog, k1) x 2, k2tog, k to m, sm, k to BOR
Rnds 19-25: k all sts
Rnd 26: k to m, sm, k18, dandelion, k to m, sm, k to BOR
Rnd 27: k to m, sm, k17, (k2tog, k1) x 2, k2tog, k to m, sm, k to BOR
Rnd 28: k all sts
SR 1: k to m, short row turn, p to BOR, sm, p to m, short row turn, k to BOR
Rnd 29: k all sts, resolving your SR turn sts according to your preferred short row method
Rnd 30: k all sts
SR 2: k to 3 sts before m, short row turn, p to BOR, sm, p to 3 sts before m, short row turn, k to BOR
Rnd 31: k all sts, resolving your SR turn sts according to your preferred short row method
Rnd 32: k all sts
SR 3: k to 6 sts before m, short row turn, p to BOR, sm, p to 6 sts before m, short row turn, k to BOR
Rnd 33: k all sts, resolving your SR turn sts according to your preferred short row method
Rnd 34: k all sts
SR 4: k to 9 sts before m, short row turn, p to BOR, sm, p to 9 sts before m, short row turn, k to BOR
Rnd 35: k all sts, resolving your SR turn sts according to your preferred short row method
Rnd 36: k all sts
Rnd 37: k all sts
Bind off and weave in your yarn tail. Keep your side markers in place for reference when seaming the base.
Crochet Base (make 2)
Row 1 is worked into the third loop of your starting ch
Row 1: ch 25, sc into the 2nd ch from the hook, 24 sc, turn
Rows 2-8: ch 1, 24 sc, turn
Row 9: ch 1, 24 sc
Shell on left side
Do not cut yarn, yo twice and insert your hook into the side of the Row 5. Make a 8 tr shell stitch, sl st into the first st on the other side of the rectangle.
Cut yarn and weave in the yarn tail.
Shell on right side
Attach yarn to the other side of the rectangle, make a 8 tr shell stitch into the side of the 5th row, sl st into the first sc of Row 9.
Cut yarn and weave in the yarn tail.

Add Lining
For a more structured bag that does not go out of shape, I recommend adding fabric lining and interfacing. This is an optional step. If you are not adding a lining to your pouch, skip ahead to the "Seam body to base" section
In my sample, I added stiff interfacing to both the body and the base.
Body lining
- Cut out a rectangle that is 24cm x 14cm on your fabric and interfacing
- Insert the interfacing layer into the body and use a pencil to mark the shape.
- Trim the excess interfacing away with scissors
- Place your interfacing on the wrong side of the fabric and use it as a template to trim the excess fabric away. Remember to keep an allowance of 1cm to fold over the interfacing
- Holding the interfacing and fabric together, insert them both into the knit body.
- Fold the overhanging fabric over the interfacing so that it is sandwiched between the knit layer and the fabric.
- Pin the fabric and interfacing together
- Backstitch along the bottom edge of the body to sew the fabric, interfacing and knit layer together
- We’ll seam along the top edge of the body after the straps are attached.

Base lining
- Use one of your crochet pieces as a template to trace and cut out some interfacing
- Trim this interfacing layer so it is slightly smaller than the crochet piece
- Sandwich the interfacing layer in between both crochet pieces, with the right sides facing out.
- Use st markers to secure the 2 crochet pieces together, thereby trapping the interfacing in between them. Ensure that your crochet pieces are perfectly aligned.

Seam body to base
 |
With 1 strand of crochet thread size #3, seam the body and base together using mattress stitch. Line up the 1st single crochet on the straight side of the base pieces and insert your needle through both loops of the sc sts on the base pieces. Insert your needle into the back loop of the cast on round of the body, 4 sts away from the side marker |
Because the crochet base has more sts than the knitted body, you need to skip sts on the crochet base. Sts are skipped only on the straight sides of the base.
Straight edges
Seam 2 sts, skip 1 st on the base only, ( seam 6 sts, skip 1 st on the base only ) x 3 reps
Curved edges
Seam all sts, no skipped sts

Knit strap
With 4mm needles, cast on 6 sts
Row 1: p6
Row 2: (sl1wyif, k1) x 3
Repeat Row 2 until your strap is of the desired length. Do note that the strap will stretch when weight is added to the bag
If you are sewing your strap directly onto the body of your pouch for non-adjustable strap, bind off your sts using a decrease bind off. Then sew your straps onto the pouch body and skip to the "Attach strap to first D-ring" section.
If you are attaching your strap using D-rings and the slide buckle for an adjustable strap, do the following
Step 1: Split your sts so that 1st, 3rd and 5th sts are on the right needle.
Step 2: Transfer the 2nd, 4th and 6th sts to scrap yarn or another needle.
Step 3: Transfer the 3 sts on your right needle to the left needle, bind off 3 sts on the purl side. Do not break yarn, keep the working loop on your right needle
Step 4: Transfer the remaining 3 sts to the left needle. Bind off 1 st on the purl side, then p3, turn
Continue working in turned rows. Row count starting over for simplicity
Row 1: k3
Row 2: p3
Repeat Rows 1 and 2 one more time. Bind off 3 sts and break yarn with a 12cm tail.
D-ring loops (make 2)
Both loops are positioned on either side of the pouch body, and are attached to the BO edge while facing the right side of the knit fabric.
Knit versionWith crochet thread #3 held double / DK yarn, pick up 3 sts with 4mm needles Row 1 (WS): sl1, p2 Repeat Rows 1-2 once more, then bind off on purl side Fold in half around the D-ring and away from you. Seam the BO edge to the wrong side of the pouch body. Cut yarn and weave in your ends. Do the same for the other D-ring loop. |
Crochet versionWith single crochet thread #3 and using the 3.5mm crochet hook, attach yarn to the front loop only with a ch1 Row 1 (RS): ch1 (mark this ch), 3sc, ch1, turn Fold in half around the D-ring and away from you. Seam the loop to the unworked back loops of the BO edge using sl sts (video tutorial) Last Row (RS): insert hook into 1st st of the D-ring loop and back loop only on the pouch body, sl st, do the same for the next 3 sts Cut yarn and weave in your ends. Do the same for the other D-ring loop. |
Attach strap to first D-ringFold the BO edge of your strap over the D-ring that is attached to one side of the pouch and seam the strap end. The strap seam should be facing inwards (video tutorial) Attach strap to adjustable sliding buckle and second D-ringWith the cast on edge of the strap, thread it through the adjustable sliding buckle and through the D-ring on the other side of the pouch. Thread the free end of the strap through the adjustable sliding buckle, on the inside to ‘close’ the strap (video tutorial) FinishingThe last step is to seam the top edge of the pouch body to the lining and interfacing. I used a mattress seam but feel free to use your preferred seaming method. (video tutorial) Weave in your ends and your Dandelion pouch is complete! I would love to see your photos on Ravelry and Instagram. Tag me (@offhook.creations) and #DandelionPouch in your photos so that I can see them :) |
|
